使用爱快Docker安装Paddle对Paddle生成的模型进行预测
文头先放上要使用的Python推理脚本。
# -*- coding: UTF-8 -*-
import os
import cv2
import time
import threading
from shutil import copyfile
import numpy as np
from scipy.ndimage.interpolation import shift
import paddlex as pdx
#处理中文路径
import importlib,sys
importlib.reload(sys)
TEMP_SEC_CALC=0
TEMP_SEC_CALC_ERROR=0
TEMP_SUM=0
TEMP_SUM_DONE=0
model = pdx.load_model('./inference_model') #Paddle加载模型
def time_convert(seconds):
seconds = seconds % (24 * 3600)
hour = seconds // 3600
seconds %= 3600
minutes = seconds // 60
seconds %= 60
return "%02d:%02d:%02d" % (hour, minutes, seconds)
def paddle_predict_calc():
global TEMP_SEC_CALC
global TEMP_SEC_CALC_ERROR
global TEMP_SUM
global TEMP_SUM_DONE
while TEMP_SUM!=TEMP_SUM_DONE:
if TEMP_SEC_CALC:
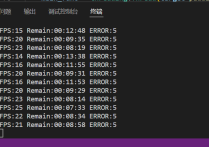
print('FPS:'+str(TEMP_SEC_CALC)+' Remain:'+time_convert((TEMP_SUM-TEMP_SUM_DONE)/TEMP_SEC_CALC) + ' ERROR:'+str(TEMP_SEC_CALC_ERROR))
TEMP_SEC_CALC = 0
time.sleep(1)
def paddle_predict(source_path,result_path,threshold_value):
#对源路径的图片进行推理
#对来自参数一目录下的图片进行分类,按分类名保存在参数二的目录下,当预测的准确度大于参数三时,保存该图片到参数二对应目录下
global TEMP_SEC_CALC_ERROR
global TEMP_SUM_DONE
global TEMP_SEC_CALC
isExists=os.path.exists(result_path)#判断目标文件夹是否存在
if not isExists:
os.makedirs(result_path)
for dirpath, dirnames, filenames in os.walk(source_path):
for filename in filenames:
try:
im = cv2.imdecode(np.fromfile(os.path.join(dirpath, filename),dtype=np.uint8),-1)
im = im.astype('float32')
result = model.predict(im)
#print(os.path.join(dirpath, filename))
isExists=os.path.exists(result_path+'/'+result[0]['category'])#判断分类文件夹是否存在
if not isExists:
os.makedirs(result_path+'/'+result[0]['category'])
if(result[0]['score']>threshold_value):
copyfile(os.path.join(dirpath, filename), result_path+'/'+result[0]['category']+'/'+filename)
#os.remove(os.path.join(dirpath, filename))
except:
#print('ERROR:'+os.path.join(dirpath, filename))
TEMP_SEC_CALC_ERROR = TEMP_SEC_CALC_ERROR + 1
TEMP_SUM_DONE = TEMP_SUM_DONE + 1
TEMP_SEC_CALC = TEMP_SEC_CALC + 1
def predict(source_path,result_path,threshold_value):
#对来自参数一目录下的图片进行分类,按分类名保存在参数二的目录下,当预测的准确度大于参数三时,保存该图片到参数二对应目录下
global TEMP_SUM
for dirpath, dirnames, filenames in os.walk(source_path):
for filename in filenames:
TEMP_SUM = TEMP_SUM + 1
print('总共发现了:'+str(TEMP_SUM)+'个文件!')
time.sleep(2)
main_func = threading.Thread(target=paddle_predict, args=(source_path,result_path,threshold_value))
calc_func = threading.Thread(target=paddle_predict_calc)
main_func.start()
calc_func.start()
predict("imgs","output",0.9)首先打开爱快的Docker页码,pull下来paddle的镜像
然后,在容器列表新建容器,我分配了40G内存给paddle容器,你可以根据自己的需求去改
注意,环境变量处记得添加变量。值为你要设置的密码。
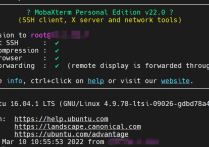
然后访问http://docker容器ip/hub/login,用户名是paddle,密码是你刚刚设置的。
此时,直接运行是会报错的,因为我们没有安装paddle等依赖。
pip install opencv-contrib-python scipy -i https://mirror.baidu.com/pypi/simple
apt-get update && apt install libgl1-mesa-glx libglib2.0-dev g++ -y
pip install paddlex filelock -i https://mirror.baidu.com/pypi/simple
然后新建python3项目,然后使用文头的代码即可,别忘了复制模型到你的目录下,然后更改代码对应部分!
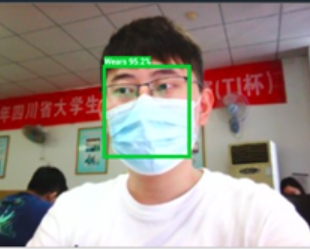
运行效果:
ps:配合docker的浏览器进行图片采集,然后进行分类,挺好用的,分配内存尽量大一点,图片去重的时候用得到,我一般分配个30-200G内存就够用了,因为再大也用不到,浏览器会在满之前崩溃。
所以最大分配个200G内存就够了,硬盘我分配了个30T,采集个一个星期没问题。
不得不说爱快这个真的挺好用